The latest in the line of growing technologies is Virtual Reality. With the increase in tech companies, getting access to the latest technology is not a tough job anymore. Virtual Reality is a computer-simulated environment which allows you to interact with it, with the help of a VR Box. Like any other Android gadget, it is easy to use, if you follow the simple steps for its installation.

Unfortunately, a frequent problem that is faced by most of the users is how to install the VR Box in the first place. Therefore, by the end of this article, all your doubts will be clarified.
How to set up VR Box on Android
One of the annoying things about Virtual Reality is getting stuck in the simulation. Moreover, it takes even more effort to get out of it if you are not that familiar with the concept. A VR Box helps you counter these problems with minimal effort.
Step 1: Setting up the VR Box for Android phones and Tablets
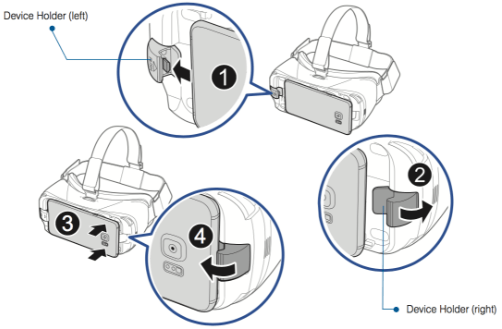
- To begin with, you need to open the main cover of the VR Box. It can be found on the front side of the Box itself.
- The next step includes opening the secondary cover, which is just underneath the first cover. These covers prove as a stand for your Android device to fit in.
- Now, place the Android device between the brackets made by the secondary covers. Also, make sure that the device has appropriately fit and does not slip.
- After this, you need to close the secondary and the main covers of the VR Box. This prevents any kind of light from entering the Box, which would cause a disturbance in the simulation. Be careful not to apply unnecessary pressure on the device as it might damage the product.
- Next up, you need to adjust the focus of the lens and the eye distance of your VR Box. You can do this by using the dials provided on the Box. This step helps the user to adjust the device according to his personal comfort.
- Finally, you need to put on the head strap provided on the Box. The strap is also adjustable and can be used as per the user requirement. After finding a comfortable position, put on the velcro which would fix the Box in the exact location you want it.
- Following these steps would complete the initial process of the installation of your VR Box.
Step 2: Pairing the VR Box with Android device or Tablet
- While some devices have a built-in mode for the Virtual Reality setup, most of the devices need an external application to be downloaded from the Google Play Store.
- On the Google Play Store, you need to search for Google Cardboard, and then download it on your Android Device.
- The application, when installed, will give you different customisation options from where you can configure the same as per as your needs and then press the ‘OK’ button in the menu bar to proceed to the next step.
- With completing the above-given steps, you have successfully paired the VR Box with your Android device.
Step 3: Enable the VR mode to use it on your Android device
- Firstly, you need to check for a suitable VR application for your device, on the Google Play Store.
- After installing it on your device, open the settings option and enable the VR mode from settings.
- After the completion of given instructions, you can mount the device and simply follow the on-screen instructions to experience the world of Virtual Reality.
Step 4: Simulation through Google VR mode
- To experience the VR simulation through Google, open browser on your device and search for “controller emulator”.
- Then you need to go to the Bluetooth option of your device.
- Here, you can rename the device, or simply pair it with the VR Box. After the pairing is finished, you are ready to enjoy the VR simulation.
Step 5: Simulation through an external device
- To view simulation through an external device, turn on the Bluetooth option on your device.
- Then pair it with your external VR remote controller.
- After this, you can configure the buttons of the remote as per your requirement, and use the device on the go.
Features of Android VR Boxes
A VR Box is a revolutionary device when it comes to experiencing the Virtual Reality simulation on your Android device. This easy to use device has a lot of features that can be accounted as its merits.
- Using a VR Box refines the capability of your device’s camera instantly.
- The high-quality lenses in the VR Box enhance the video quality of the device it is used on.
- VR Box helps in taking perfect 360-degree shots from your device.
This device has transformed the way people use their Android devices for different purposes. It has made the experience, more surprising than ever, as it enhances most of the specifications of your device.
This was a guide on how to use the VR Box on any Android device, and hopefully, it has cleared all your doubts on this subject as well.
Recommended for you:
Leave a Reply